How to Read Chord Diagrams
There are several styles of chord diagram that you can encounter. I will explain how to read those that are found on this website and hopefully you'll be able to figure the rest out yourself. Each chord diagram is made up of a grid representing the strings and frets of a guitar.
.jpg)
On the diagram above the six vertical lines are labelled: E A D G B & E. These lines represent the strings on a guitar. The four horizontal lines represent the frets. This diagram has the nut at the top so naturally the frets shown are frets 1, 2, 3 and 4. Below you will see a diagram showing how to play a basic C major chord:
.jpg)
The numbers placed on the frets recommend which finger you should use. There is a lesson on hand labelling if you don't know how the fingers are labelled. Any string marked with an X is not strummed. All the other strings are included in the strum. The O's show which strings are not fretted (held down). The diagram above shows the 1st finger on fret 1 of the B-string, the 2nd finger on fret 2 of the D-string and the 3rd finger on fret 3 of the A-string. It also shows that all except the Low E-string (thickest, lowest sounding string) are included in the strum.
Below you will see a chord diagram for chords further up the fretboard:
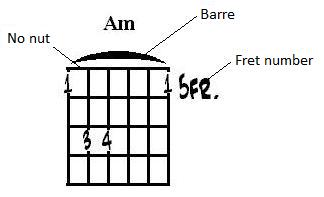
As you can see the top horizontal line is much thinner as it is not representing the nut. A fret number is given on the right-hand side to indicate which frets are being shown. The line labelled 'Barre' indicates that you should hold down all of the strings between the two points. The chord diagram above shows that all of the strings are held down at fret 5 using the 1st finger. It also shows the A and D string being held down at the 7th fret using the 3rd and 4th finger.
Note - there are some variations that you might encounter when reading different styles of chord diagrams:
- Five frets may be displayed instead of the four fret diagrams shown above
- Dots may be used instead of numbers to indicate where to put your fingers. However, these are less informative as you have to decide which fingers to use.
- The fret number may appear on the left-hand side instead of the right-hand side.